1、进入 python3 的 Miniconda 虚拟环境
创建及进入方法,参见: https://www.cnblogs.com/rslai/p/18741276
2、安装 fastmcp 库
pip install fastmcp
安装成功后执行 pip list | grep fastmcp 可以查看已经安装 fastmcp 。如下图

3、创建 server 项目
A)新建一个目录,例如 mcp_server,目录名可以根据需要随意起
B)在 mcp_server 目录中,创建一个文件,例如 server.py。将一下代码粘贴进去
# import json
# import httpx
# from typing import Any
# from mcp.server.fastmcp import FastMCP# # 初始化 MCP 服务器
# mcp = FastMCP("WeatherServer")# # OpenWeather API 配置
# OPENWEATHER_API_BASE = "https://api.openweathermap.org/data/2.5/weather"
# API_KEY = "YOUR_API_KEY"# 请替换为你自己的 OpenWeather API Key
# USER_AGENT = "weather-app/1.0"# async def fetch_weather(city: str) -> dict[str, Any] | None:
#     """
#     从 OpenWeather API 获取天气信息。
#     :param city: 城市名称(需使用英文,如 Beijing)
#     :return: 天气数据字典;若出错返回包含 error 信息的字典
#     """
#     params = {
#         "q": city,
#         "appid": API_KEY,
#         "units": "metric",
#         "lang": "zh_cn"
#     }
#     headers = {"User-Agent": USER_AGENT}#     async with httpx.AsyncClient() as client:
#         try:
#             response = await client.get(OPENWEATHER_API_BASE, params=params, headers=headers, timeout=30.0)
#             response.raise_for_status()
#             return response.json()  # 返回字典类型
#         except httpx.HTTPStatusError as e:
#             return {"error": f"HTTP 错误: {e.response.status_code}"}
#         except Exception as e:
#             return {"error": f"请求失败: {str(e)}"}# def format_weather(data: dict[str, Any] | str) -> str:
#     """
#     将天气数据格式化为易读文本。
#     :param data: 天气数据(可以是字典或 JSON 字符串)
#     :return: 格式化后的天气信息字符串
#     """
#     # 如果传入的是字符串,则先转换为字典
#     if isinstance(data, str):
#         try:
#             data = json.loads(data)
#         except Exception as e:
#             return f"无法解析天气数据: {e}"#     # 如果数据中包含错误信息,直接返回错误提示
#     if"error"in data:
#         return f"⚠️ {data['error']}"#     # 提取数据时做容错处理
#     city = data.get("name", "未知")
#     country = data.get("sys", {}).get("country", "未知")
#     temp = data.get("main", {}).get("temp", "N/A")
#     humidity = data.get("main", {}).get("humidity", "N/A")
#     wind_speed = data.get("wind", {}).get("speed", "N/A")
#     # weather 可能为空列表,因此用 [0] 前先提供默认字典
#     weather_list = data.get("weather", [{}])
#     description = weather_list[0].get("description", "未知")#     return (
#         f"🌍 {city}, {country}\n"
#         f"🌡 温度: {temp}°C\n"
#         f"💧 湿度: {humidity}%\n"
#         f"🌬 风速: {wind_speed} m/s\n"
#         f"🌤 天气: {description}\n"
#     )# @mcp.tool()
# async def query_weather(city: str) -> str:
#     """
#     输入指定城市的英文名称,返回今日天气查询结果。
#     :param city: 城市名称(需使用英文)
#     :return: 格式化后的天气信息
#     """
#     data = await fetch_weather(city)
#     return format_weather(data)# if __name__ == "__main__":
#     # 以标准 I/O 方式运行 MCP 服务器
#     mcp.run(transport='stdio')# =============# from mcp.server.fastmcp import FastMCP# # 初始化FastMCP服务器
# mcp = FastMCP("filesystem")# @mcp.tool()
# async def create_file(file_name: str, content: str) -> str:
#     """
#     创建文件
#     :param file_name: 文件名
#     :param content: 文件内容
#     :return: 创建成功消息
#     """
#     try:
#         with open(file_name, "w", encoding="utf-8") as file:
#             file.write(content)
#         return f"文件'{file_name}'创建成功"
#     except Exception as e:
#         return f"创建文件失败: {str(e)}"# @mcp.tool()
# async def read_file(file_name: str) -> str:
#     """
#     读取文件内容
#     :param file_name: 文件名
#     :return: 文件内容或错误消息
#     """
#     try:
#         with open(file_name, "r", encoding="utf-8") as file:
#             return file.read()
#     except FileNotFoundError:
#         return f"文件'{file_name}'未找到"
#     except Exception as e:
#         return f"读取文件失败: {str(e)}"# @mcp.tool()
# async def write_file(file_name: str, content: str) -> str:
#     """
#     写入文件内容
#     :param file_name: 文件名
#     :param content: 文件内容
#     :return: 写入成功消息
#     """
#     try:
#         with open(file_name, "w", encoding="utf-8") as file:
#             file.write(content)
#         return f"文件'{file_name}'写入成功"
#     except Exception as e:
#         return f"写入文件失败: {str(e)}"# if __name__ == "__main__":
#     # 以标准 I/O 方式运行 MCP 服务器
#     mcp.run(transport="stdio")# -*- coding: utf-8 -*-
# @Time : 2025/7/28 17:09
# @Author : yangwenjie
# @Email : 邮箱
# @File : server-sse.py
# @Project : fastmcp
# weather_sse.py
from fastmcp import FastMCP
import random# 创建MCP服务器实例,指定端口
mcp = FastMCP("Weather Service", port=3002)# 模拟的天气数据
weather_data = {"New York": {"temp": range(10, 25), "conditions": ["sunny", "cloudy", "rainy"]},"London": {"temp": range(5, 20), "conditions": ["cloudy", "rainy", "foggy"]},"Tokyo": {"temp": range(15, 30), "conditions": ["sunny", "cloudy", "humid"]},"Sydney": {"temp": range(20, 35), "conditions": ["sunny", "clear", "hot"]},
}@mcp.tool()
def get_weather(city: str) -> dict:"""获取指定城市的当前天气"""if city not in weather_data:return {"error": f"无法找到城市 {city} 的天气数据"}data = weather_data[city]temp = random.choice(list(data["temp"]))condition = random.choice(data["conditions"])return {"city": city,"temperature": temp,"condition": condition,"unit": "celsius"}@mcp.resource("weather://cities")
def get_available_cities() -> list:"""获取所有可用的城市列表"""return list(weather_data.keys())@mcp.resource("weather://forecast/{city}")
def get_forecast(city: str) -> dict:"""获取指定城市的天气预报资源"""if city not in weather_data:return {"error": f"无法找到城市 {city} 的天气预报"}forecast = []for i in range(5):  # 5天预报data = weather_data[city]temp = random.choice(list(data["temp"]))condition = random.choice(data["conditions"])forecast.append({"day": i + 1,"temperature": temp,"condition": condition})return {"city": city,"forecast": forecast,"unit": "celsius"}if __name__ == "__main__":# 使用SSE传输方式启动服务器mcp.run(transport="sse")
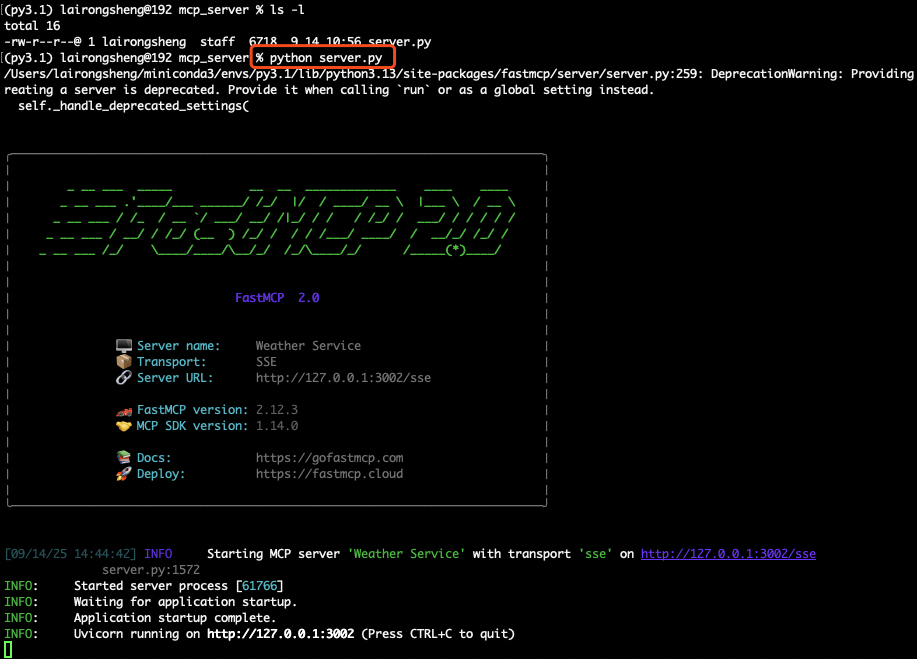
4、启动 mcp server
在命令行中进入刚创建的目录,并执行如下命令启动 mcp server
python server.py
启动成功后如下图
参考文档:
https://waytoagi.feishu.cn/wiki/SV2pw9YvpiQtvPkXoOwcCgQVnTc
https://www.cnblogs.com/ywjfx/p/19015133