测试中为什么需要Mock
在实际的测试中,被测试的对象并不都是可以通过简单的new操作符就可以创建出来的!
实际的业务代码中,一个业务类往往要依赖很多其他的类才能完成一个完整的业务方法,这些依赖包括第三方的rpc,db的查询等等,具体的拓扑如下图
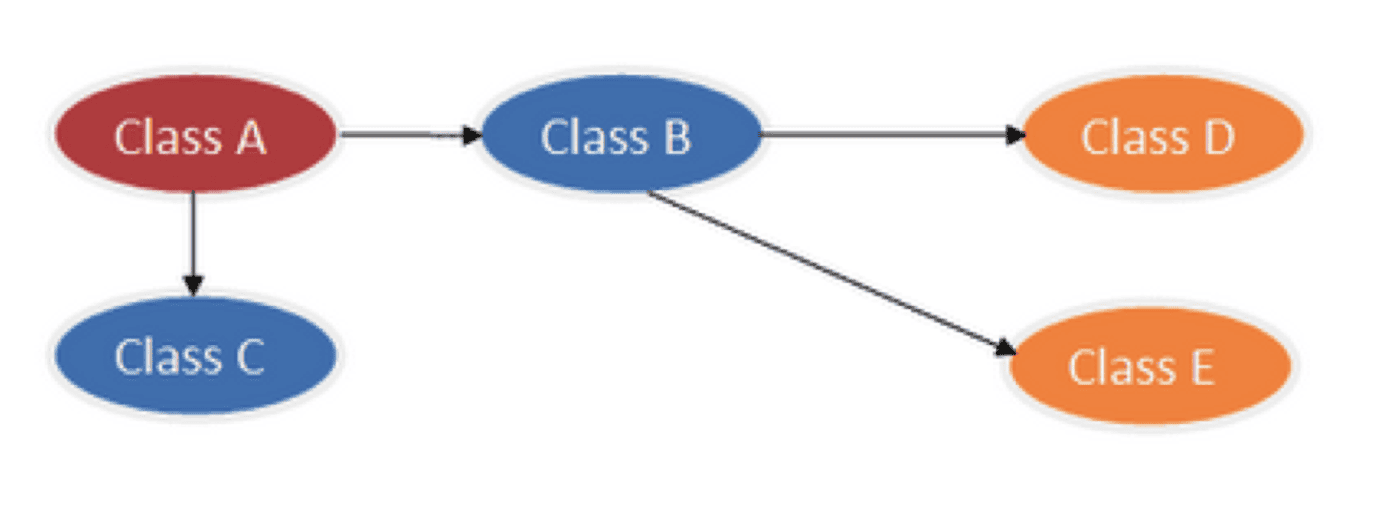
我们想测试ClassA,但是ClassA依赖ClassB和ClassC,其中ClassB又依赖ClassD和ClassE,我们要初始化ClassA,需要构造5个类,除了ClassA直接依赖的ClassB和ClassC的部分方法的返回值外,其他的4个类的逻辑对我们测试ClassA方法没有任何帮助,都是累赘。
Mockito提供了一种非常简单的方式,让我们Mock被测试类的依赖,让更多的精力聚集到真正的测试逻辑上,也不是构造初始化依赖类上。
添加Maven依赖
<dependencies><!-- Mockito 核心依赖--><dependency><groupId>org.mockito</groupId><artifactId>mockito-core</artifactId><version>${mockito.version}</version><scope>test</scope></dependency><!-- Mockito 的 JUnit 5 扩展--><dependency><groupId>org.mockito</groupId><artifactId>mockito-junit-jupiter</artifactId><version>${mockito.version}</version><scope>test</scope></dependency>
</dependencies>
mockito-core的作用
- 创建模拟对象:通过
Mockito.mock()或@Mock注解创建接口或类的模拟实例。 - 存根方法行为:定义模拟对象的方法返回值或异常(如
when(...).thenReturn(...))。 - 验证交互:检查模拟对象的方法是否被调用(如
verify(mock).method())。
mockito-junit-jupiter的作用
- 自动初始化模拟对象:通过
@ExtendWith(MockitoExtension.class)自动创建@Mock和@InjectMocks注解标记的实例。 - 依赖注入:将
@Mock对象自动注入到@InjectMocks标记的待测类中。 - 减少样板代码:无需手动调用
MockitoAnnotations.openMocks(this)。
主要概念及使用模版
概念
- 被测试类:我们最应该关注的类,我们测试的对象
- 依赖类:被测试类的依赖类,大部分都是需要我们mock掉的类,要不就是太难构造,要不就是没有稳定的返回值,要不就是跟我们测试关系不大
- 存根stub:告诉Mockito被mock的方法,在接收到不同的参数时,返回什么的返回值
- mock对象:Mockito使用mock方式mock的依赖类,不对方法进行stub时,调用mock方法返回默认值/null
- spy对象:Mockito使用spy方式mock的依赖类,不对方法进行stub时,调用mock方法执行真实逻辑
如Mockito官网所说:
使用 Mockito 只能做两件事 - 存根stub或验证verify 。存根在执行之前进行,验证在执行之后进行。
使用Mockito后的测试模版
- mock依赖类
- 新建被测试对象,并把mock对象注入进去
- 对测试需要的mock对象的方法进行stub存根
- 调用被测试的方法
- 对结果进行断言
- 对mock对象的方法进行行为验证verify、对mock对象方法的入参(参数捕获)进行断言
使用Mockito
代码准备
// 被测试类
class UserService {private UserRepository userRepository;public UserService(UserRepository userRepository) {this.userRepository = userRepository;}public String getUserName(Long userId) {return userRepository.findNameById(userId);}
}// 依赖接口
interface UserRepository {String findNameById(Long userId);
}
一、二、Mock依赖类并注入
对于模版中的第1步和第2步,Mockito支持了三种方式
1. API方式,并手动注入
class UserServiceTest {@Testvoid testGetUserName() {// 1. mock依赖类, 此处已mock方式为例,spy也是同样方式(特别注意spy只能接受非空对象,此处是个接口使用spy会报错,只是举个小栗子)UserRepository userRepositoryMock = Mockito.mock(UserRepository.class);// 2. 新建被测试对象,并把mock对象注入进去,此处使用构造方法注入,当然也可以使用setter注入UserService userService = new UserService(userRepositoryMock);// 剩下的步骤// .....
    }
}
2. 注解+MockitoAnnotations.openMocks(this)
class UserServiceTest {/*** 1. mock依赖类, 此处已@Mock注解为例,@Spy也是同样方式* @Mock和Mockito.mock()等效* @Spy和Mockito.spy()等效(特别注意spy只能接受非空对象,此处是个接口使用spy会报错,只是举个小栗子)*/@Mockprivate UserRepository userRepositoryMock;/*** 2. 使用@InjectMocks会自动新建被测试对象,并把被@Mock/@Spy修饰的对象注入进去*/@InjectMocksprivate UserService userService;private AutoCloseable autoCloseable;@BeforeEachvoid setUp() {// 初始化Mock对象,手动开启注解autoCloseable = MockitoAnnotations.openMocks(this);}@AfterEachvoid tearDown() throws Exception {// 关闭Mock对象,手动关闭新建的对象
        autoCloseable.close();}@Testvoid testGetUserName() {// 剩下的步骤// .....
    }
}
3. 注解+扩展@ExtendWith(MockitoExtension.class) (推荐)
@ExtendWith(MockitoExtension.class) // 自动初始化Mock并关闭
class UserServiceTest {/*** 1. mock依赖类, 此处已@Mock注解为例,@Spy也是同样方式* @Mock和Mockito.mock()等效* @Spy和Mockito.spy()等效(特别注意spy只能接受非空对象,此处是个接口使用spy会报错,只是举个小栗子)*/@Mockprivate UserRepository userRepositoryMock;/*** 2. 使用@InjectMocks会自动新建被测试对象,并把被@Mock/@Spy修饰的对象注入进去*/@InjectMocksprivate UserService userService;@Testvoid testGetUserName() {// 剩下的步骤// .....
    }
}
关于mock和spy的进一步说明
静态方法的mock
下面是MockedStatic的使用例子,使用mockConstruction()新建MockedConstruction进行构造方法的mock也是同理哈,就不赘述了
1. API方式
MockedStatic是AutoCloseable的子类,此处使用了try-with-resources语句来处理, 当然你也可以在@BeforeEach中调用 Mockito.mockStatic(XXClass.class) ,在@AfterEach里进行关闭 mockedStatic.close();
class UserServiceTest {@Testvoid testGetUserName() {// 1. mock依赖类, 此处已mock方式为例,spy也是同样方式(特别注意spy只能接受非空对象,此处是个接口使用spy会报错,只是举个小栗子)UserRepository userRepositoryMock = Mockito.mock(UserRepository.class);// 2. 新建被测试对象,并把mock对象注入进去,此处使用构造方法注入,当然也可以使用setter注入UserService userService = new UserService(userRepositoryMock);// 2.1 对需要的静态方法进行mocktry (MockedStatic<XXClass> mockedStatic = Mockito.mockStatic(XXClass.class)) {// 2.2 对需要的静态方法进行stubmockedStatic.when(() -> XXClass.getXXX()).thenReturn(YYY);// 剩下的步骤// .....
        }}
}
2. 使用@Mock注解(推荐)
使用注解时,需要配置MockitoAnnotations.openMocks(this)或者@ExtendWith(MockitoExtension.class)一起使用,MockedStatic的关闭就可以交给Mockito自己管理
class UserServiceTest {@MockMockedStatic<XXClass> mockedStatic;@Testvoid testGetUserName() {// 剩下的步骤// .....
    }
}
三、存根Stub
对于模版里的第三步就简单多了,按着Mockito的javaDoc来用就OK了
简单例子
//You can mock concrete classes, not just interfacesLinkedList mockedList = mock(LinkedList.class);//stubbingwhen(mockedList.get(0)).thenReturn("first");when(mockedList.get(1)).thenThrow(new RuntimeException());//following prints "first"System.out.println(mockedList.get(0));//following throws runtime exceptionSystem.out.println(mockedList.get(1));//following prints "null" because get(999) was not stubbedSystem.out.println(mockedList.get(999));
连续存根
 when(mock.someMethod("some arg")).thenThrow(new RuntimeException()).thenReturn("foo");//First call: throws runtime exception:mock.someMethod("some arg");//Second call: prints "foo"System.out.println(mock.someMethod("some arg"));//Any consecutive call: prints "foo" as well (last stubbing wins).System.out.println(mock.someMethod("some arg"));// 或者使用下面方式
when(mock.someMethod("some arg")).thenReturn("one", "two", "three");
特别注意: 连续存储或多次存更效果是不一样的, 下面这种多次存根,后面的存根会覆盖前面的存根,每次调用都返回最后一次
//All mock.someMethod("some arg") calls will return "two"when(mock.someMethod("some arg")).thenReturn("one")when(mock.someMethod("some arg")).thenReturn("two")
上面的方式都需要有个返回值,那void方法应该怎么存根呢? 可以使用doXXX方式
doXXX方法进行存根
You can use doThrow(), doAnswer(), doNothing(), doReturn() and doCallRealMethod() in place of the corresponding call with when(), for any method. It is necessary when you
stub void methods
stub methods on spy objects (see below)
stub the same method more than once, to change the behaviour of a mock in the middle of a test.
参数匹配器
在存根时或者验证方法时,有时不关心方法的入参是什么,此时就可以使用参数匹配器了
 //stubbing using built-in anyInt() argument matcherwhen(mockedList.get(anyInt())).thenReturn("element");//stubbing using custom matcher (let's say isValid() returns your own matcher implementation):when(mockedList.contains(argThat(isValid()))).thenReturn(true);//following prints "element"System.out.println(mockedList.get(999));//you can also verify using an argument matcher
 verify(mockedList).get(anyInt());//argument matchers can also be written as Java 8 Lambdasverify(mockedList).add(argThat(someString -> someString.length() > 5));
其他类型详见: ArgumentMatchers.anyXXX()方法
| 函数名 | 匹配类型 |
|---|---|
| any() | 所有对象类型 |
| anyInt() | 基本类型 int、非 null 的 Integer 类型 |
| anyChar() | 基本类型 char、非 null 的 Character 类型 |
| anyShort() | 基本类型 short、非 null 的 Short 类型 |
| anyBoolean() | 基本类型 boolean、非 null 的 Boolean 类型 |
| anyDouble() | 基本类型 double、非 null 的 Double 类型 |
| anyFloat() | 基本类型 float、非 null 的 Float 类型 |
| anyLong() | 基本类型 long、非 null 的 Long 类型 |
| anyByte() | 基本类型 byte、非 null 的 Byte 类型 |
| anyString() | String 类型(不能是 null) |
| anyList() | List<T> 类型(不能是 null) |
| anyMap() | Map<K, V>类型(不能是 null) |
| anyCollection() | Collection<T>类型(不能是 null) |
| anySet() | Set<T>类型(不能是 null) |
any(Class<T> type) |
type类型的对象(不能是 null) |
| isNull() | null |
| notNull() | 非 null |
| isNotNull() | 非 null |
四、调用被测试方法
构造入参,调用被测试类的方法进行测试吧
五、对结果断言
断言使用
六、行为验证Verify
当测试对象 A 依赖 B(B 被 Mock),而 A 的内部逻辑间接调用了 B 的方法时,需通过 verify() 验证 B 是否被正确调用。
是对 被mock的对象的方法 行为的验证,最常用的为:调用次数
// 基础用法:验证方法是否被调用
verify(mockObject).methodName();// 验证调用次数
verify(mockObject, times(n)).methodName(); // 精确 n 次
verify(mockObject, never()).methodName();  // 从未调用
verify(mockObject, atLeastOnce()).methodName(); // 至少一次
还可以验证方法的调用顺序
InOrder inOrder = inOrder(mockRepo);
inOrder.verify(mockRepo).save("Alice");
inOrder.verify(mockRepo).flush();
参数捕获
创建参数捕获器有两种方
// 声明要捕获的参数类型
ArgumentCaptor<User> userCaptor = ArgumentCaptor.forClass(User.class);// 或者使用注解方式
@Captor
ArgumentCaptor<User> msgArgumentCaptor;
在验证时捕获参数
// 单次捕获
verify(userRepository).save(userCaptor.capture());
// 获得参数并验证
User capturedUser = userCaptor.getValue();
assertThat(capturedUser.getName()).isEqualTo("Alice");
assertThat(capturedUser.getAge()).isEqualTo(30);
如果被验证的方法调用了多次,就可以获得捕获的多个参数
// 捕获所有调用参数
verify(mockRepo, times(3)).save(userCaptor.capture());
List<User> allUsers = userCaptor.getAllValues();assertThat(allUsers).extracting(User::getName).containsExactly("Alice", "Bob", "Charlie");
参考
mockito的wiki: https://github.com/mockito/mockito/wiki
使用方法都在 javadoc中,写的很详细 https://javadoc.io/doc/org.mockito/mockito-core/latest/org.mockito/org/mockito/Mockito.html
mockito中的一篇文章:如何编写好的测试 https://github.com/mockito/mockito/wiki/How-to-write-good-tests
https://pdai.tech/md/develop/ut/dev-ut-x-mockito.html